
When people first heard about caviar manicures, many of them were unsure of what to expect. Was this a manicure that actually involved the use of caviar? Were these nail designs poised to look like appetisers? What exactly was happening? The confusion was evident in the questions that people were raising on and off social media. But once people finally got a look at the actual manicures, they quickly realised that these nail sets were a quick way to look like a million bucks, and that the use of the term caviar was more of symbolism. What’s more, these nails were so easy to achieve that people could DIY their way into this edgy look. Over a decade later, caviar manicures still continue to wow nail enthusiasts.
Our guide walks you through what they entail, why people cannot seem to get enough of them, and the tips to keep in mind if you choose to do these sets yourself.
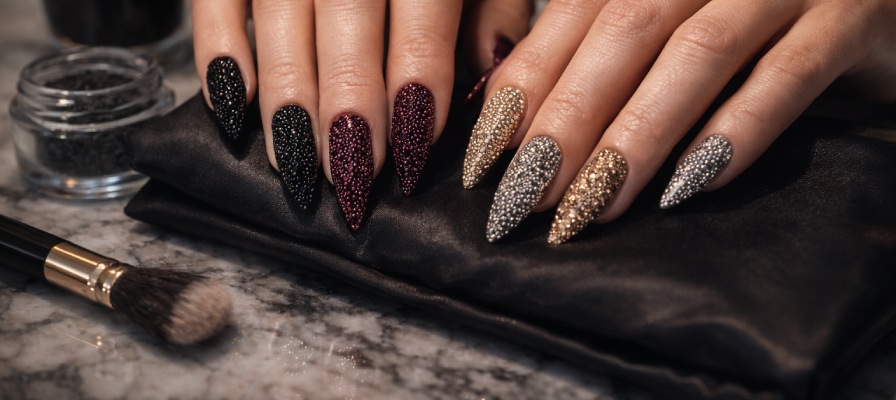
Why Caviar?
Caviar evokes different reactions from people. Some cannot get enough of it, others do not understand its appeal, and others remain neutral. However, even though attitudes towards this appetiser may differ, one thing is for sure – it embodies luxury and enjoying it is more of an experience than fueling your body.
But how did we move from an aesthetic dish to a manicure? Well, it all started with the similarity in appearance. You see, caviar, which is sourced from sturgeon roes, has a bead-like appearance. So, when the caviar manicure first came out, with its tiny glass beads, people saw the resemblance to caviar.
But that’s not all. The use of tiny beads in the manicures gave them an effortlessly luxurious look, which again tied to the exclusivity of caviar. And it was not long before these manicures became known as the caviar manicures.
Women loved them, not just for their sophisticated look but also their incredibly satisfying textures and versatility. And just like that, they became a mainstay!
Achieving the Caviar Look
Many nail technicians and artists have mastered the art of caviar manicures. And they, like anyone else who has tried these sets, will tell you that it is a labour of love. So, how does it work?
First, you have to create the base by applying two coats of the nail polish you wish to use. Allow the first one to dry. But while the second one is wet, you proceed with sprinkling tiny beads over the nail until you have completely covered its surface.
Your work does not end with the sprinkling. If anything, now is the time to double down on your efforts. You must gently press the beads into the polish so that they stick. Given that they are tiny, this is a delicate process where you do not want to use so much force as to smudge your polish, but do not want to be too gentle, either, as this can result in the failure to lodge all the beads into the polish.
Once satisfied that you have full coverage, you have to wait at least 20 minutes to allow the coat to cure. Unlike other types of manicures, you are not to add another coat over the beads as you want them to shine. However, some people apply some top coat on the edge of the nail to lock the beads in, but this is optional.
Ready to DIY?
While caviar manicures may seem very sophisticated, they are quite easy to replicate, and millions of women have done so over the years. Using the process we detailed in this guide, you can also do the same. To help you avoid the common pitfalls that many women face on their first few tries, we have some tips for you:
Use a Tray
Working with tiny beads can be quite a hassle, and things can get messy very fast when pouring the beads over your nails. We recommend using a small bowl or tray under your nails when pouring the beads so that you can collect the beads that spill over. We also advise that you do the application in a location where cleaning up will be easy.
Take it Slow
As we said, you stick the beads to the nails upon applying the second coat. But for this to work, the nail polish must be wet. That means that if you are working on all ten fingers at once, then your polish is likely to dry out before you have completed all the nails. It is much better to work on one nail at a time. While it might be slower, it is more effective and does away with the rush to move to the next nail before it dries out.
Seal Your Edges
We mentioned that a top coat is optional. But given that beads tend to catch on clothes and other surfaces, leading to popping off, we advise that you apply a bit of clear coat at the very tips of your nails. You still get the shine of the beads, but avoid the rough edges.